Sunday, June 1, 2014

Shimmer

I spotted this super-simple DIY on Pinterest: Create garland with circle stickers! Kudos to Nicoline of o-k-e-r for this fun idea.


All you need are:

- string (I used embroidery thread)
- and scissors


Adhere the sticker to the string, then fold it in half.


Repeat for as long as you'd like.


Me and a few friends created a bunch in a random length, then tied them in random directions for a web-like effect. I then taped it on my wall and ceiling to let it cascade around me.

Monday, May 26, 2014

Cascade, Roses

Create a lovely backdrop with this simple DIY. 


Crochet's versatility lends itself to a variety of applications. The chain stitch, the foundational technique, is great for everything from organization to accessory creation, even without incorporating other crochet stitch techniques.

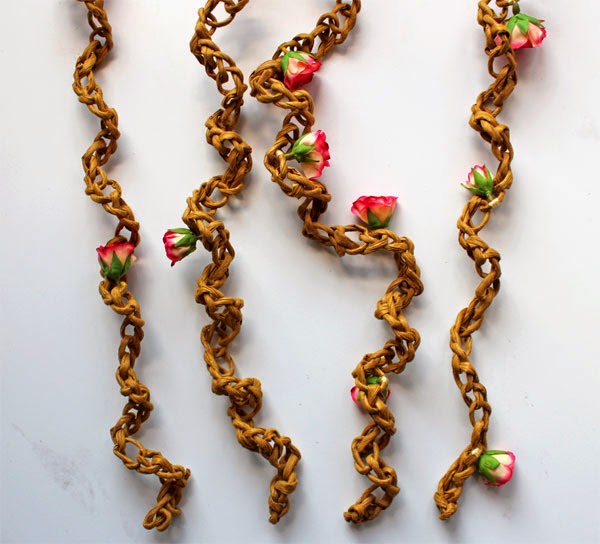
I'm making decorations for a friend's wedding by crocheting simple chain stitches with thick, paper twine and wrapping faux flowers around some of the stitches. Inside the flowers are tiny bells, in order for this decoration to contribute to the wedding's musical landscape, as well!

In addition to paper twine and faux flowers, you'll also need:

- embroidery thread
- an embroidery needle
- a large crochet hook. I think I used size S-35, but unfortunately my hook doesn't have its size written on it.
- scissors


First remove the faux flowers from their stems. Many faux flowers have a hole right in the middle, so you'll want to be sure to remove any obstructions to that hole.


The craft bells I used were similar to these, and had a tiny opening that made stringing easy. Tie a few knots at the end to secure the string to the bell. 


Then, insert the other end into your embroidery needle, in order to insert the string into your flower.


Create a chain stitch with your paper twine into your desired length. See here for a chain stitch tutorial from Lion Brand Yarn. I used a big crochet hook in order for the individual stitches to be wide enough to comfortably wrap the roses around. It was also much easer to crochet the thick twine with this size hook.


My twine was so thick that it created gorgeous spirals.


Once you've crocheted your desired length, tightly wrap your flowers around the stitches. I randomly chose the stitches to wrap them around. 


Be sure to wrap the flower securely. Once finished, weave the ends using your embroidery needle.


I weave my ends in both directions, in to make sure they're especially secure.


Enjoy your new decorations! Hang them on the tree for fun garden party decor, or create a gorgeous bohemian look indoors.


Wednesday, May 21, 2014

Paper Flower, Paper Garden


I've missed this blog. The time between now and my last post has been spent adjusting to new work responsibilities and a new apartment. I've learned so much, and truly feel present, confident and eager to make an impact. I'm excited for the future.

For the past few months, I've also been helping a dear friend create decorations for her July 5 wedding. We have very big plans with a strict budget, and want the wedding to be as much of an artistic statement as a declaration of united love. Of course, it is important for me to incorporate as many handmade elements as possible. Some of the decorations that I've been making are tissue paper flowers. This is a super-easy technique that doesn't require much time at all.

In order to make them, you'll need:

- a pack of tissue paper
- Modge Podge glue
- scissors
- masking tape
- a tree branch
- a scrap piece of designed paper. I used pieces of old music sheets.


The pack I used contained 10 sheets of tissue paper, and measured 20 inches by 24 inches when unfolded and laid flat. Without unfolding it, the first thing I did was cut it in half.


I then put one half to the side, and fully opened the other half.


I vertically cut this piece in half again, using the middle paper crease as a guide.


One of these halves, which now measure 12 3/4 inches by 10 inches, will be used to create one flower. As you see, though, there's a lot of tissue paper left over. A pack of tissue paper in the size and amount I used should yield four flowers.

The half that you cut should also contain the appropriate number of individual sheets of tissue paper that you'll need. For one flower, you'll need about nine sheets.


To make the first petal, take one of the sheets of tissue paper and fold it in half lengthwise, with the pre-made creases horizontal. My folded piece of paper measured 6 3/8 inches by 10 inches. 


Next, hold the folded half at the bottom, approximately in the middle.


Gently begin bunching either side together and upward, being careful not to rip the paper.


You should end up with a cone-like shape.


Next, twist the bottom, which will serve as the base of your flower petal. Twist tightly, but again be careful not to rip the paper. 


This is what one petal should look like when completed:


Repeat the above steps with the other eight pieces of paper. 


Then, apply glue to the twisted base of one petal. You only need to apply glue to one side of the base. I used my finger to my apply the glue, but of course you're welcome to use a brush.


Adhere the glued petal to another one, then apply glue to the other petals in the same way, in order to create your bouquet. To give the bouquet as much of a uniform shape as possible, adhere the petals to the top and bottom of the petal bases, as well as the sides.


If you prefer to have rounded petal tips instead of pointed ones, simply take a pair of scissors and curve each of the exposed tips you see. 


Next, add "stem" to the flower by attaching it to a small tree branch using masking tape, wrapping the tape around the branch and glued petal bases. 


You could then glue a small piece of decorative paper around the attached masking tape, in order to cover it. 


Follow all of the above steps using tissue paper in multiple colors, in order to create a lovely bouquet!


Monday, July 15, 2013

Button-Collared

An old collared shirt can be given a small makeover to create a new, fun style. It's easy: just add buttons!


All you need for this project are scissors, thread (I used Dual Duty Plus from Coats), a small needle and a diverse collection of buttons. You are likely to find interesting buttons at thrift stores, flea markets and on Etsy


I would recommend laying out your buttons on your collar before sewing them on, then taking a picture of the layout. I changed the layout a bit as I sewed, and added other buttons from my collection, but it was helpful to have a template to go off of. 


When hand-sewing, I often think of a few tips by Alabama Chanin, who I had the pleasure of meeting a few years ago. Namely, that my thread should only be as long as my fingertips to my elbow, and that I should love my thread by running it between my fingers. Learn why, in this lovely video


I also find it important to make sure to sew with a double strand of thread, and to make a good knot before and after I sew. Learn more about the physics of sewing by hand in this article, again by Alabama Chanin. 


The good thing about sewing on top of a collar is that your thread is, for the most part, hidden from view. I started my stitches on the underside of the collar, but the majority of the stitching was made in between the top and bottom collar pieces. It gave a neater appearance to the top and underside, although I'm sure it could be neater if I had better sewing skills. Oh well :) 


Ta-da!