

Here are the materials that I used:
- two cardboard boxes of the same dimensions (width, height etc)
- a box cutter or X-Acto knife
- a pencil
- a ruler
- Modge Podge glue
- a paintbrush
- an plastic pan or container (for the glue)
- a paper cutter (you can also use scissors, but a paper cutter is preferred)
- masking tape
- double-sided tape
- scrap paper (I used an old, thrifted textbook but you could use any type of paper you want)
- a plastic bag or sheet to protect your table top when applying the glue
- a bone folder (optional)


First, open up your boxes on the top and bottom.

Then, take one of the boxes and measure the width of its sides. One of the boxes will be used as the sides of the shadow box's nook. The other one will be the base of the shadow box.

Choose whichever box will be used as the nook sides, then use your paper cutter to make 3-4 strips with it that are the exact size of your box width. You may need to cut these down slightly when you actually begin to assemble your box, but we'll cross that bridge when we get there :)


Now, take the other box, which will be your shadow box base, and open it completely apart. Lay it flat on your work table.

With you ruler and pencil, draw a rectangle on the inside (unprinted) portion of one side of your box. It can be any size that fits within one side, although I would suggest having it at least one inch away from each of your box's sides.


With your box cutter or X-Acto knife, cut out the rectangle you just drew.

Measure the sides of your rectangle cut-out, then cut the strips you cut from the other box according to those measurements. Make sure the sides fit comfortably in the rectangle. If they're too big, cut them down to the appropriate size. It's ok if they're a little too small (but not too much). Later on, you will be able to cover small gaps with masking tape.


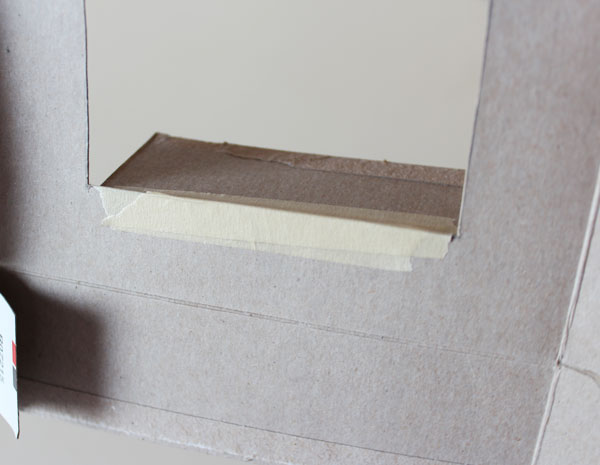
Now, place a piece of masking tape on the bottom edge of one of your side pieces.

Carefully tape it to the outside (printed) portion of your box, within the appropriate rectangle side. Make sure that it is flush against your rectangle cut-out edge, and that it isn't protruding out on the other side too much.

Put another piece of tape one the inside. I put a few pieces on both the inside and outside to make it extra secure.
Repeat these steps for all of your side pieces, making sure that they all stick straight up.
Then, adhere the sides together by placing pieces of masking tape around them, and covering any gaps that may have occurred from side pieces that were too small. Your tape placement doesn't have to be perfect. It will soon be decoupaged over.

This is how it should now look on the printed side of your box.

Please note: the reason why your shadow box's nook is assembled on the printed (front) side of your box is because the printed side needs to become the inside of your box. The printed paper used on most boxes does not adhere to glue well, if at all.
Reassemble the box so that the unprinted portion can now be the outside, as this side can adhere to glue the best. Use double-sided tape to adhere any broken seams to one another, and make sure the box is completely closed.

You can also add a few pieces of tape to the sides of the nook, in order to further secure it.

A small part of the printed portion of the box will still be showing from your cardboard cutout. To remedy this, cover this portion completely with masking tape. Again, this doesn't have to be perfect. It will be soon be decoupaged.

Now you can begin to decoupage!

Take your scrap paper pieces and completely cover your box, making sure that you are adequately covering the inside portion, as well as the outside. Use your bone folder to smooth out any air bubbles, and make sure you are still maintaining the box's creases as best as you can.

Please note: since the side cardboard pieces you cut from the second box are not completely secure to the back of your box, be a bit careful when adhering the paper pieces to the inside. It may be easy to push the back with your finger and rip the paper as you trying to apply it. To keep this from happening, carefully apply a few layers of paper over the inside back edges of your box to strengthen it.
Once your box is completely covered, apply a 1-2 coatings of Modge Podge over the box. This will make the box a bit sturdier, and will also act as a protectant.

I had to hold it from the front, inside the nook, for a few minutes in order for the back and sides to dry.

Once the box is dried and covered completely, you're done! I loved my final result, and hope you love yours, too.

Coincidentally, it holds my business cards perfectly, plus it's sturdy enough for some of my thread spools. I hung it on my wall by hammering a nail in the middle of it.

You're my new hero! Keep up the amazing work and make sure to keep in touch with me from time to time so I can feature your work. Warmly, Happy Holidays, Mark Montano www.MarkMontano.com
ReplyDeleteThank you, Mark! You are amazing! Have a fantastic holiday, too.
Delete- David
Thank you so much, Julia! I really appreciate that. The roundup looks wonderful!
ReplyDelete- David
Thank you for sharing! I love it! I scooped your post on
ReplyDeleteCrafty Crafts